| Activity | Learning Objective Practised |
|---|---|
| 1. Orientation and Teardown | LO3: visual hierarchy and audience attention |
| 2. Brief Sprint | LO6: a visual asset aligned to claim, stage, and route |
| 3. Canva Build Sprint | LO1 and LO2: fluency and dual coding audit, connotation check, and LO5: AI classification at the point of image choice |
| 4. Critique Carousel | LO3: visual hierarchy, tested against a real viewer |
| 5. Fix, Variant, and Accessibility Check | LO4: platform format and accessibility standards, and LO2: connotation across audiences |
| 6. Gallery Share and Upload | LO7: evidence, inference, and assumption in the decision record |
Week 3 Tutorial: Visual Asset Set
Tutorial Visual Asset Set
Discussion
1 Orientation and Teardown
⏱ 15 min
Concept check, then a guided teardown of one strong and one weak campaign asset.
Production
2 Brief Sprint
⏱ 10 min
Write a three-line design brief from your Week 2 canvas.
Production
3 Canva Build Sprint
⏱ 40 min
Widen your options with AI, then build and finalise the hero asset in Canva.
Practice
4 Critique Carousel
⏱ 15 min
Swap screens in pairs and audit each other’s draft.
Production
5 Fix, Variant, Accessibility
⏱ 25 min
Apply one fix, export a second size, run the contrast check, write alt text.
Assessment
6 Gallery Share and Upload
⏱ 15 min
Show your asset, complete the decision record, upload the PDF.
Your tutorial session runs for two hours, and you spend most of it making things. You will take your Week 2 positioning canvas, translate it into a three-line design brief, use AI to widen your options and audit your thinking at three specific checkpoints, and finish the build and the final edit in Canva. The session closes with an exported asset, a second-size variant, and a one-page decision record, and the Canva export is what you submit.
Table 1 maps each activity to the learning objective it builds, so you can see which skill you are practising at every stage of the session.
AI-Assisted Workflow: Ideation to Submission
AI supports this tutorial at three specific checkpoints, and Canva carries every checkpoint through to a finished, exportable asset. The workflow runs in one direction: your own brief first, AI widening your options and auditing your draft second, and Canva for the build, the fix, and the final export you submit.
AI serves three purposes here. First, once your brief exists, AI can propose alternative layouts or colour treatments for you to build from in Canva, giving you more starting points than you would generate alone. Second, once a draft exists, AI can audit it against the theory from the lecture: whether the headline and image pass the dual coding congruence test, whether the layout rewards or punishes cognitive fluency, and what the image connotes to an audience beyond your own. Third, AI can draft alt text for review against the standard from the lecture.
The discipline from Weeks 1 and 2 applies here: every AI-assisted claim must be traceable to a documented visual source or labelled as an assumption. A design decision based on AI aesthetic preference is an assumption. A design decision based on documented platform specifications, brand guidelines, or accessibility standards is evidence-based. The governing principle is no evidence, no claim.
Use the following workflow during the tutorial and self-learning:
- Write your three-line design brief yourself, from your Week 2 canvas, before using AI for anything.
- During the build sprint, use AI to suggest two alternative layouts or colour treatments for your brief, then build the stronger option in Canva. Record the prompt, the output, and which suggestions you accepted or rejected.
- Still inside the build sprint, use AI to run the dual coding congruence check: could your image be replaced by any other stock image without changing the asset’s meaning? If the answer is yes, revise the image choice in Canva before moving on.
- After the critique carousel, use AI to audit your revised draft: ask it to identify the dominant element, the hierarchy principles at work, and any accessibility risks. Compare its reading with your partner’s, then make the fix in Canva.
- Use AI to draft alt text for your finished asset, then review the draft against the alt text standard: describe what the image communicates rather than what it depicts. Enter the final version in Canva’s alt text field for the exported asset.
- Finalise every AI-influenced decision inside Canva. Canva is where the asset is actually built, refined, and exported, and the Canva export is what you submit, rather than the AI output on its own.
Keep a prompt log using the template from Table 1 in the Week 1 Tutorial. At least three prompts must be logged with evidence links and student decisions.
Tutorial Task
In your two-hour tutorial, you will design and export a real campaign asset. You will build it in Canva (free tier), or in any tool from the Open-Source Visual Design Tools section of the lecture chapter if you prefer. By the end of the session you will have three things:
- A hero asset for your primary platform, exported at the correct dimensions.
- A second-size variant of the same asset for your secondary platform or format.
- A one-page design decision record that makes the asset defensible: every major design choice traced to your Week 2 canvas and labelled as evidence-based or [ASSUMPTION].
The decision record is the evidence layer, and the asset is the point. The record has eight entries, shown in Table 2. Complete it as you build rather than afterwards: the contrast ratio, alt text, and platform dimensions all come out of the build itself.
Label every entry using the three-way classification from the Image Evidence Standards section of the lecture chapter: evidence-based (a documented source such as a citation, a tool reading, or a licence), inferred (a reasonable reading of documented evidence that stops short of direct proof), or [ASSUMPTION] (a choice made on preference or convenience, with a testing method attached). Most entries in a first-draft asset land as inferred or assumed, and that is expected: the record’s purpose is to show which is which.
| Entry | Your Entry |
|---|---|
| Positioning claim this asset expresses (from Week 2 canvas) | Complete during the build. Label evidence-based, inferred, or [ASSUMPTION], then state a source or a testing method. |
| Hierarchy stage and ELM route (from Week 2 canvas) | Complete during the build. Label evidence-based, inferred, or [ASSUMPTION], then state a source or a testing method. |
| Dominant element, and the hierarchy principle that makes it dominant | Complete during the build. Label evidence-based, inferred, or [ASSUMPTION], then state a source or a testing method. |
| Colour palette (hex codes) and tool-reported contrast ratio for the primary text-to-background pair | Complete during the build. Label evidence-based, inferred, or [ASSUMPTION], then state a source or a testing method. |
| Platform, dimensions, and specification source URL with access date | Complete during the build. Label evidence-based, inferred, or [ASSUMPTION], then state a source or a testing method. |
| Image source and evidence tier (evidence-based, inferred, or assumed), with a disclosure plan if AI-generated | Complete during the build. Label evidence-based, inferred, or [ASSUMPTION], then state a source or a testing method. |
| Alt text for the asset | Complete during the build. Label evidence-based, inferred, or [ASSUMPTION], then state a source or a testing method. |
| One assumption in the design, and the evidence that would test it | Complete during the build. Label evidence-based, inferred, or [ASSUMPTION], then state a source or a testing method. |
NoteWorked example: a filled decision record
The record below shows four entries filled in for the Villa College Certificate asset in Figure 7 of the lecture chapter. Notice how the same record mixes all three evidence tiers.
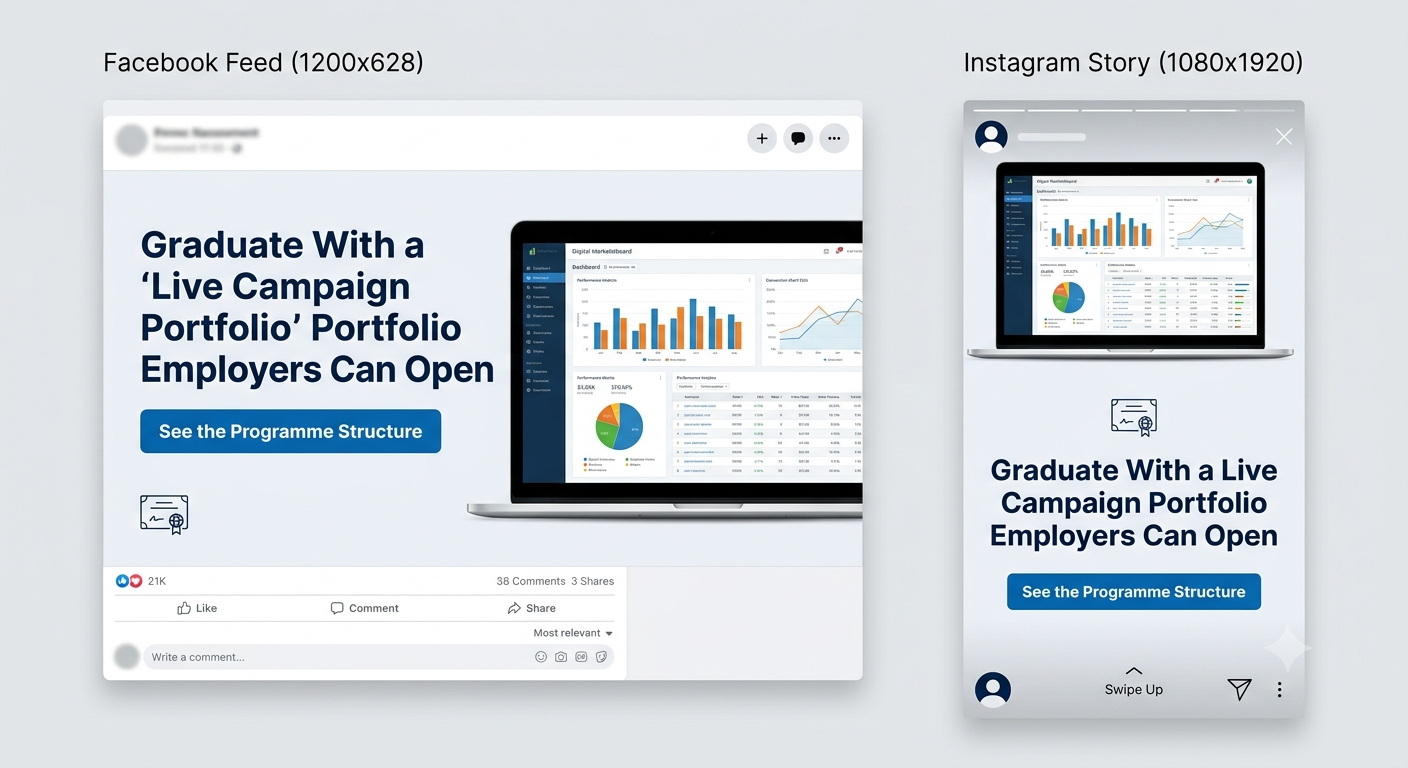
- Positioning claim: “Graduate with a live campaign portfolio employers can open.” Evidence-based: taken directly from the Week 2 canvas.
- Dominant element: the headline claim, set at the largest scale and highest contrast on the canvas. Evidence-based: the tool-reported contrast ratio is 12.6:1, comfortably passing WCAG 2.2 AA.
- Colour palette: navy #002147 on background #edf1f7. Evidence-based for the contrast ratio, but inferred for the specific shade choice, since it follows the institutional brand palette without a dedicated audience preference test.
- Image source: a screenshot of a live analytics dashboard, brand-owned. Evidence-based: no disclosure is required because the image is a real screenshot rather than AI-generated.
A record this specific is what turns a design choice into something a reader can check.
Figure 1 shows the two outputs this decision record describes: the hero asset at its primary platform dimensions, and the second-size variant the same brief produces once the layout is rebuilt for a taller format rather than merely scaled.
If Canva is unavailable during the session (no account, no connectivity), sketch the layout on paper, photograph it, and complete the decision record in full. Production then moves to self-directed study. A sketched layout with a complete decision record beats a polished image with no rationale.
In-Class Activities
Your two-hour tutorial has six activities, and from Activity 3 onwards you are building. Work through them in order. Each activity feeds directly into the asset you export and the decision record you upload.
Activity 1: Orientation, Concept Check, and Exemplar Teardown (15 minutes)
Format: Whole class | Output: Three-question concept check result and a shared quality benchmark | Timing: Opening 15 minutes
Complete the three-question Moodle concept check individually and without notes. Keep a note of the question you found most difficult.
NoteMoodle Concept Check: Week 3
Open the Week 3 Concept Check quiz in Moodle under the Week 3 activities panel.
Question 1. A campaign hero image can be swapped for almost any other attractive image without changing the meaning of the asset. According to the dual coding congruence test, this image is:
- Decorative rather than functional, so it adds no dual-coding recall advantage
- Functional, because any image activates the non-verbal memory system
- Acceptable, provided the image passes the WCAG 2.2 contrast check
- Persuasive, because attractive images increase cognitive fluency
Question 2. WCAG 2.2 at the AA level requires what minimum contrast ratio between normal-size text and its background?
- 3:1
- 4.5:1
- 7:1
- 2.5:1
Question 3. Which alt text for a campaign image of students working in a computer lab meets the standard taught this week?
- “Image of students in a classroom.”
- “Photo.”
- “Students building a live campaign in the digital marketing lab, the hands-on format the programme is known for.”
- “A high-resolution 1200 by 628 pixel JPEG showing a computer lab.”
After the concept check, your tutor will tear down two real campaign assets in four minutes: one that earns a second glance and one that loses it. Watch for three things in each: what you see first, whether that element carries the campaign’s claim, and whether you would stop scrolling. Figure 2 shows a worked example of the same exercise, using the Villa College Certificate campaign that recurs through this chapter, so you have a concrete reference even if your tutor’s live assets are different. These three questions are the quality benchmark for everything you build today.


| Version A | Version B | |
|---|---|---|
| Sees first | The decorative handshake photo | The headline itself, bold and large |
| Carries the claim | No single element carries a specific claim | The dominant element is the claim |
| Would stop scrolling | Unlikely, since nothing is specific to this audience | Likely, since the claim is specific and testable |
Activity 2: Brief Sprint (10 minutes)
Format: Individual | Output: A three-line design brief | Timing: Before you open any design tool
Open your Week 2 canvas and write exactly three lines:
- Claim: the positioning claim this asset must express, in the audience’s language.
- Stage and route: your hierarchy of effects stage and ELM processing route, and what they imply (credibility cues for central-route Knowledge audiences, a strong single visual cue for peripheral-route Awareness audiences).
- Platform: your primary platform and format, with the dimensions from Table 2 in the lecture chapter.
This brief is the whole translation step. If a line is carried from a canvas cell marked [ASSUMPTION], it stays an assumption here. Show the brief to your tutor or a neighbour before moving on: a weak brief produces a weak asset, and it is cheaper to fix now.
NoteWorked example: a three-line brief
Claim: A live campaign portfolio beats a transcript when an employer asks for evidence.
Stage and route: Knowledge-to-Preference, central route. The audience is evaluating options and needs specific credibility cues (a named outcome, a citable testimonial) rather than a single emotional visual.
Platform: Facebook / LinkedIn Feed, 1200 x 628 px, safe zone central 80 per cent (from Table 2 in the lecture chapter).
This is the brief behind the Villa College Certificate asset shown throughout this chapter. Notice how short it is: three lines are enough to constrain every decision that follows.
Activity 3: Canva Build Sprint (40 minutes)
Format: Individual | Output: A first-draft hero asset at correct platform dimensions | Timing: Core production block
This activity runs in three parts: a short AI ideation step, the Canva build, and an AI congruence check before you move on.
Part A, AI ideation (5 minutes). Give your three-line brief to an AI tool and ask for two alternative layout or colour treatments. Read both, note which assumption each one makes about your audience, and pick the stronger starting point. Record the prompt and your decision in your prompt log.
TipSample prompt and output
Prompt: “Here is my campaign brief. Claim: A live campaign portfolio beats a transcript when an employer asks for evidence. Stage and route: Knowledge-to-Preference, central route. Platform: Facebook/LinkedIn Feed, 1200x628px. Suggest two different layout or colour treatments for this feed asset, and tell me what assumption each one makes about the audience.”
Output: “Treatment 1: dark navy background, the claim in large white type, the institutional mark small at the top. This assumes the audience responds to institutional authority as the primary trust cue. Treatment 2: light background, the claim paired with a screenshot of an analytics dashboard, the mark reduced further. This assumes the audience is more persuaded by seeing the actual portfolio artefact than by an authority cue alone.”
Student decision: Compare both treatments against your own stage and route, then build the stronger option in Canva. Here, Treatment 2 wins for a central-route audience because it makes the claim demonstrable rather than merely asserted.
Figure 3 shows both AI-suggested treatments described above, so you can see what “authority cue” and “demonstrable proof” actually look like as finished layouts rather than descriptions.


Part B, Canva build (25 minutes). Open Canva (free tier) and create a design at your platform’s dimensions. Build your hero asset from the brief, using the stronger AI-suggested treatment as a starting point rather than a finished answer. Work fast and rough first, then refine. Apply three rules as you build:
- The dominant element carries the claim. The thing the eye reaches first must be the positioning claim or the image that expresses it, at the largest scale or the highest contrast on the canvas.
- One accent colour, one call to action. Reserve your highest-saturation colour for the single action you want, and place the call to action where the eye path ends (bottom right in a Z-pattern layout).
- Real text, real image decision. Use your actual claim wording rather than placeholder text, and choose your image source deliberately: owned photography, licensed stock, or AI-generated with a disclosure plan. Classify it as you choose it, using the AI image decision tree from the lecture.
Part C, AI congruence check (10 minutes). Ask AI whether your headline and image pass the dual coding congruence test: could the image be swapped for any other stock image without changing the asset’s meaning? If the answer is yes, the pairing is decorative rather than functional, and you should revise the image choice in Canva before the critique carousel.
TipSample prompt and output
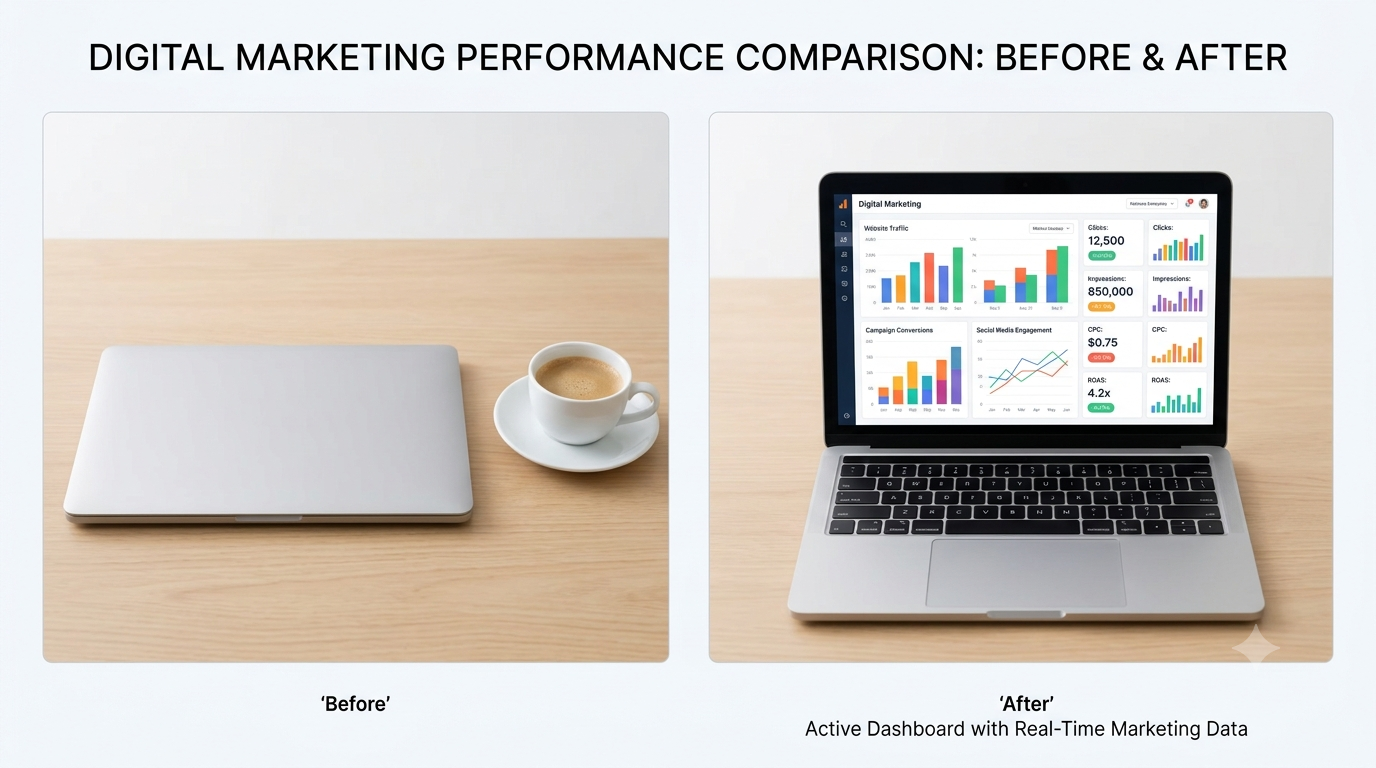
Prompt: “My headline reads: ‘Graduate with a live campaign portfolio employers can open.’ My image is a generic stock photo of a laptop on a desk. Could this image be swapped for almost any other office stock photo without changing what the asset communicates?”
Output: “Yes. A laptop-on-a-desk photo carries no connection to the specific claim about a portfolio. It would work equally well for an unrelated finance, consulting, or software advert. To pass the congruence test, the image needs to show the actual artefact the claim describes, for example a screenshot of a live analytics dashboard or a student presenting one.”
Student decision: Replace any image that fails the congruence test with one that shows the specific artefact your own claim describes, the way this example replaces a generic laptop photo with a dashboard screenshot in Canva.
Figure 4 shows the fix this student made: the closed, generic laptop on the left fails the congruence test, and the active dashboard on the right passes it, because it shows the specific artefact the claim describes.
Your tutor circulates during the sprint. When they reach you, be ready to answer one question: “Which canvas decision does this design choice come from?”
TipStuck staring at a blank canvas?
Start from a Canva template for your format, then replace every element that conflicts with your brief: the headline becomes your claim, the accent colour becomes yours, the stock image becomes your deliberate image choice. A template is scaffolding. What must survive is the brief, and what usually goes is most of the template.
Activity 4: Critique Carousel (15 minutes)
Format: Pairs | Output: Three critique answers received and given | Timing: Straight after the build sprint
Swap screens with a partner. Look at their draft for ten seconds, then answer three questions about it, out loud and honestly:
- What did you see first?
- Is that the claim? Does the dominant element carry what the campaign needs the audience to process first?
- Would you stop scrolling? If yes, what stopped you? If no, what would?
Then swap roles. Record your partner’s three answers: they go into your decision record as the first external evidence about your design. A partner who saw the decorative image first, and the claim last, has just told you what the visual hierarchy actually does, whatever you intended.
Figure 5 shows the asset the worked example below is critiquing, so you can see exactly what “the image dominates instead of the claim” looks like before reading the diagnosis.

TipWorked example: a partner’s answers
What did you see first? The busy handshake collage with icons and gold flourishes, well before any single word of text.
Is that the claim? The collage carries a generic partnership cue, while the actual claim is buried somewhere inside the dense paragraph underneath it.
Would you stop scrolling? Unlikely. There is too much to read before reaching the small Request Info button, and no single element tells me what to look at first.
This answer set tells the author that the image is currently the dominant element instead of the claim, which is the fix to prioritise in Activity 5.
TipDominance comes from contrast rather than size alone
A small, high-contrast element in a sea of grey can dominate a large, low-contrast element. If your partner saw the wrong thing first, the fix is usually contrast or isolation rather than making the claim bigger.
Activity 5: Fix, Variant, and Accessibility Check (25 minutes)
Format: Individual | Output: Revised asset, second-size export, contrast record, alt text | Timing: After the carousel
Work through four steps on your own asset:
- Apply one fix from the carousel feedback. One deliberate change, recorded in the decision record with the reason.
- Export the second size. Resize or rebuild the asset for your secondary platform or format. Check what breaks: text that becomes illegible at the new size, or an element that leaves the safe zone, must be adjusted rather than merely scaled.
- Run the contrast check on your own colours. Take the hex codes of your primary text and its background straight from Canva’s colour picker and enter them in the WebAIM Contrast Checker. Record the tool-reported ratio in the decision record. The AA standard for normal text is 4.5:1. If you fail, darken the text, lighten the background, or enlarge the type, and re-check.
- Write the alt text for your own asset, then test it with the connotation question: what does this image say to your target segment, and what might it say to a different audience (an international tourist and a Malé local can read the same beach image in opposite ways)? If the connotation for your segment conflicts with your claim, the image choice is wrong, however good the composition.
NoteAlt text standard
Informative alt text answers the question: what does this image communicate to the audience in this context? “Sunset over the Maldives” describes the image. “Guests watching the sunset from a private overwater deck, illustrating the resort’s promise of exclusive access” communicates what the image is doing in the campaign.
Keep alt text short and specific to the function of the image in the campaign rather than a description of its visual content.
TipSample prompt and output
Prompt: “Draft alt text for this campaign image: a student reviewing a live analytics dashboard on a laptop screen. The image supports the claim: ‘Graduate with a live campaign portfolio employers can open.’ Write alt text that describes what the image communicates in this campaign context rather than what it depicts.”
Output: “A student reviewing a live analytics dashboard, illustrating the portfolio the programme produces.”
Student decision: Check your own AI draft against the standard above. Keep it as written when it names the function rather than only the visual content, revise it when it only describes appearance, then enter the final version in Canva’s alt text field.
Further Practice: AI Image Classification
Use these six cases to test yourself before the Moodle quiz, or return to them during independent study. Classify each as Permitted, Permitted with Disclosure, or Restricted using the AI image decision tree from the lecture. For each Permitted with Disclosure or Restricted case, note the specific risk and what the team should do instead.
| Use case | Classification | Specific risk | What to do |
|---|---|---|---|
| Generate a photorealistic image of a Maldivian beach resort using an AI image tool, without a real property in mind, to use as the hero image for an eco-resort campaign | |||
| Generate an abstract blue-and-white texture to use as a background in a LinkedIn banner | |||
| Use an AI tool to produce a diverse group of people appearing to enjoy a meal at a restaurant, for use in a social media post promoting a new menu | |||
| Use an AI concept sketch of a proposed coastal guesthouse interior to brief a photographer on the session brief | |||
| Use a licensed stock photograph of a coral reef (licence confirmed for commercial use) to illustrate a resort’s marine conservation pledge | |||
| Replace an actual product photograph with an AI-generated version because the product remains unmanufactured |